Tag: April

April flowers

The most beautiful season has started and our garden is in full bloom! Every little plant and tree seems to be bursting with flowers and the backyard is buzzing with bees, butterflies and hummingbirds.
This April was a festival of colors and aromas and our yard looked like a celebration for the eyes and the nose as well.
Among all our trees, the pomelo had the most amazing fragrance, and also the strongest given its large size. Many little bugs and hummingbirds were attracted by the hundreds of flowers.
We inherited over a dozen kinds of roses when we got the house and they all have different fragrance and colors. These are just a few of their blooms.


How to transplant eggplants in pots

In this post I will explain step by step how to transplant eggplants in pots. I used 5 gallons containers for each seedling.
Here are the eggplants that I transplanted today. I started them from seeds and grew them indoors, then gradually hardened them. If you’d like to read more about their lifetime story, please take a look at this post.

How to transplant eggplants in pots
Firstly I filled the pots with potting mix, which I made using my recipe. If you’d like to see how it was made and which ingredients I used, click here.
Afterwards, I made a hole in the middle and I added half scoop of starter fertilizer, a quarter scoop of epsom salt and half a scoop of grounded eggshells. The measuring scoop that I used is the red one from the picture below.


The next step is to place the eggplant seedling in the hole and cover it partially with the potting mix. Afterwards I add the earthworm castings and cover it with a thin layer of potting mix, as seen in the pictures below.


Updates
In the next section I will periodically post pictures with the eggplants throughout the season.
The first picture is from today, April 30.
How to transplant cucumbers in pots

In today’s post I will explain how to transplant cucumbers in pots. The ones that I used are 5 gallons size.
Firstly, I made my own potting mix using 3 buckets of wood chips, one bucket of peat moss, one bucket of steer manure, half bucket of perlite and the old soil from 4 pots. Last year’s plants already took most of the nutrients from the soil, so it needed to be enriched.
After I mixed all the ingredients together, I had enough potting mix to fill 11 pots. Below are a few pictures with the ingredients.
The cucumber seedlings which I transplanted can be seen in the picture below. I planted a few of them in 3 pots (2 seedlings in each one) and the remaining ones in the ground.
How to transplant cucumbers in pots
First I filled the pots with potting mix and I made a hole in the middle. After that I added the starter fertilizer, epsom salt and grounded eggshells.

The quantities that I used are half of my scoop of starter fertilizer, half scoop of eggshells and a quarter scoop of epsom salt. The measure scoop that I used is the red one in the picture below.
I had 4 cucumbers seedlings in the same square and I splitted them in 2. You have to be careful when you do it since the cucumbers don’t like it when you mess with their roots. They are much more sensible than other plants.
I placed one of them in the hole and covered it with soil. After that, I put the worm castings and covered them with a thin layer of potting mix.


Earthworm castings

Updates
In this section I will regularly add pictures with the different stages of the cucumber plants throughout the season.
April 2020 Harvest

During the month of April, lettuce thrived the most. My lettuce plants didn’t do well during the winter months, but this month you could see them grow from one day to another. We made lettuce soup twice this month and we also ate many salads.

This year the artichoke started flowering a few months earlier comparing to last year. Artichoke is one of my favorite vegetables in the garden.


I harvested my first parsnips for this year.

In the picture below is my volunteer broccoli, which ended up being the best looking and the biggest broccoli flower of this season’s harvest.


Preparations for the first heat wave of the season

Lately we’ve been having some crazy weather here in Los Angeles. A few weeks ago the temperatures during the day were in the 60s and 50s and I was preparing for a week of rain. Now we are preparing for the first heat wave of the season with temperatures in the high 90s.
I have to protect my newly transplanted seedlings and older plants from such big variations in temperature.
In preparation for the upcoming heat wave, I needed to finish installing the drip irrigation system and I also had to cover as many plants as possible.
Drip irrigation system
A brief history first …
I’ve been using a drip irrigation system since I started gardening. I have two different drip irrigation systems: one for the in-ground plants and another one for the container plants.
The timer that I’m using is an Orbit 3-Outlet Hose Watering Timer, but I’m currently only using two of them. I used to have a 2-outlet timer which broke only a few months after I moved into the current house. I had the 2 outlet timer for 3 years and I’ve been very happy with it, so I decided to replace it with the same brand, but I got the one with 3 outlets in case I will extend the garden. Well, a few months later this one failed also. I started to have second thoughts about the brand. Before doing more research I called Orbit warranty department for a replacement and they suggested to check the water pressure because the max PSI for the timer is 120.
A few months later, after the replacement timer was starting to act strangely, I finally purchased a water pressure testing device . I had a feeling that this might have been the main problem since almost everything that I attached to my external water circuit was failing after a few month of use. The water pressure was 160 PSI, while my indoor water circuit pressure was around 75 PSI.
It took a while until I had the time to fix the water pressure issue, but this winter I finally reduced the pressure with a water reducing valve. Now the pressure is down to 50 PSI, but I would preffer it to be between 80 to 100 PSI. Until I will find how the pressure can be changed, I’ll live with it.
When I started writing this post, my intention wasn’t to focus too much on the history of my irrigation system. But I felt that a few details wiould be useful. Probably in the future I’ll dedicate a full post to this subject.
Back to present day …
As the majority of my seedlings are already transplanted in the garden, I installed about 90% of my drip irrigation system for the in ground plants. I still have to install most of the irrigation system for the container plants, because I haven’t decided yet on the final location for all the containers.
Below are the pictures with the timer and the irrigation system.


Protecting young plants during a heat wave
The second project was to prepare the young plants for the upcoming heat wave. Going from 66 degrees to 97 in just 4 days is a big shock for the plants, especially when they are so young. Usually I don’t cover my plants unless the temperature is over 100 degrees. But I didn’t want to risk anything so early in the season and I wanted to covered them as much as I could. As a side note, last year I didn’t cover them at all since we didn’t have any days over 100 degrees all year long (it was a very nice summer!).
I feel like I should give a very brief history of the tarp also 🙂 . The year 2018 had a somewhat similar weather pattern with this present year. After having good weather in January and February, March was very cold and it delayed all the plants and trees. The summer had a few heat waves with temperatures over 100 degrees. On one occasion, we had temperatures of 112-114 for 3 straight days, which was the worst that our Los Angeles area had in decades. The heat affected quite a few of the mature and established fruit trees. Personally I lost all the grapes and the fruits from almost 50% of my trees. So now I’m hoping (and preparing) that it won’t happen again.
Because of the crazy weather from 2 years ago, I decided to purchase extra tarp coverings in order to be able to protect my plants. Fortunately I didn’t have to use them until now.
Below are a few pictures.


How to transplant peppers and eggplants

The main project of the day was to transplant peppers and eggplants. Below is the list with all the projects presented in today’s post.
- Transplant peppers and eggplants
- Split eggplant seedlings into individual pots
- Relocate a few celery plants
- Transplant basil plants next to my tomato plants
- Transplant garlic
- Plant radishes and bush beans
Transplant peppers and eggplants
Most of the seedlings are ready to be transplanted in the garden, but I currently have some winter vegetables that I would like to keep for a few more weeks. I had a location in my garden with radishes that did not do that well, so I removed them and transplanted 6 eggplants and 4 peppers in their place.


Split eggplant seedlings into individual pots
A few months ago, on February 15, I moved a few eggplant seedlings into 1 gallon pots, as you can see it in the seedlings update post. It was time to split them up into individual pots.


Relocate celery
In one of my tomato garden beds I have a lot of volunteer celery from last year’s plants seeds. I removed some and relocated them into another spot in my garden, between 2 old trees.


Transplant basil
Next project was to transplant basil into the tomato garden beds, because basil is a good companion plant to tomatoes. Same as the eggplants, I had 3 or 4 plants in each pot and I split them up before transplanting.


Transplant garlic
Last year I planted garlic and onion on the edges of my garden beds. I didn’t harvest all the garlic, so this year they spouted again in groups. I split them up and planted them between peppers and eggplants.


Planting radishes
I had a few pots that will be empty for another month, so I decided to plant radishes in them, since they should be ready to eat in 1 month. Because I had some extra space after removing the volunteer celery, I planted radishes there too.


Planting bush beans
While going through my seeds collection, I discovered a very old packet from 2012 with gold rush bush beans. Since their planting time in my zone is between March and August, I decided to give it a try. I planted them in 4 of my 5 gallon pots. Fingers crossed!


Garden update – April 14 2020

My papaya plant has more fruits now.

The cherry tomato plant is doing very well. It’s at least double in size comparing to all the other tomatoes planted at the same time.


I think the volunteer broccoli is bigger than all the other broccoli, which were carefully planted on purpose.


The garden bed with peppers and eggplants has radishes and lettuce that I will harvest in the next few weeks to make space for all the new seedlings.

The next 2 pictures are with my tomato garden beds. The tomatoes planted between parsnip are doing well, but the ones next to the onion and celery are all yellow. I gave them some fertilizer and removed most of the celery leafs so they can get more sun, hopefully they will recover.


Below is the second garden bed with peppers and eggplants.


The last year tomato growing nicely after I pruned it on March 7 as showed in this post

I harvested my first artichoke flower last week, and 3 more flowers are left on the plant.


The parsnip is almost as big as the Eureka lemon tree 🙂 .


The mandarin tree has fruits and flowers.

Out of 4 fig trees that have fruit on them, 2 trees have figs that are drying and falling down. This seems to be the normal cycle for this type of fig trees. Last year also the first harvest dried and feel down, but the second harvest in late summer, had hundreds of delicious fruits.


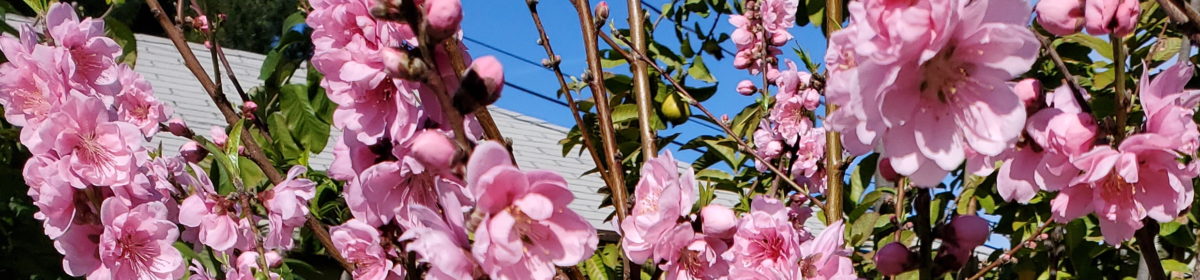
Below are pictures with 2 different kinds of peach trees.


Preparations for 5 days of rain – April 4 2020

We are expecting 5 consecutive days of rain in a few days. I had some projects that needed to be finished before then:
- find a place for the new grape vine that I received from a friend
- transplant the last tomato seedlings
- empty the barrels for rainwater collection
- plant cucumbers and radishes
Below is a picture with my newest addition to the garden: a Kyoho grapevine that I received from a friend. My garden is almost full and the gravine needed a place with full sun, so I decided to place it next to the house. This is probably a temporary location for this year. I built a small wood structure with the materials that I already had, and which I plan to extend as needed.

The next project was to transplant the last 3 tomato seedlings. Below is a picture with one of them. They needed to be transplanted, because they were growing too big for their pots. I was trying to postpone the transplant because I have parsnip currently growing in the location where I wanted to put the tomatoes. I was hoping that I could delay it by another 2 weeks, but as you can see in the second picture, the roots were very close to be root bound.


This is the location that I had planed for my last 2 tomatoes seedlings. I removed 2 parsnip plants to make room for the tomatoes and probably will remove the other ones in 2-3 weeks.


In the picture below, if you look very carefully, you can see the new tomatoes. I bent the parsnip leafs for the tomatoes to get more sun.

I planted the last tomato in a 15 gallon container.
My plan for this year was to plant tomatoes only in the ground and have less than 20 plants total. But because of the coronavirus, I will plant a few in containers also, to have extra produce to share with neighbors and friends.


This is my rain water collection system. I emptied the barrels to make space for the next round of rain water.

The cucumbers that I transplanted in the garden a month ago have died because I transplanted them too early outside. We had very nice weather at the end of February, but in March it was raining a lot and it was cold during the night. Cucumbers need night temperatures of over 50. I planted new cucumbers seeds and I plan to keep them inside for now, because we will have another week with temperatures below 50.

I also tried to grow vegetables that grow faster, so we wouldn’t need to go often to the grocery store during the quarantine. I planted radishes wherever I saw an empty space, like between these peepers and eggplants.
